Setup Guide on How to Install WordPress in Your Web Server
A detailed 5 minutes installation process on how to install WordPress in your web server by simply following the step-by-step instructions.
In this lesson, we will cover the popular WordPress 5 minutes installation process.
However, if this is your first time installing WordPress in your web server this lesson is for you, as we will be installing it manually provided with a screenshots for you to have a better picture about the process.
Also, we will provide a description for some of the terminologies used for those who are new with WordPress and Web hosting.
Prerequisites
Before we start with the process. We want you to be familiar with the following:
1. Web Hosting Control Panel
Make sure that you have your control panel (CPANEL ) login credentials. If you can’t remember what it is, check your email using the email address during your web hosting signup they should dispatch and email containing your login credentials to your web server.
If you can’t find it then you may want to contact your webhost technical support.
2. Creating a Database using DataBase Wizard in your Control Panel
Make sure that you already know how to create a database using Database wizard in your Web hosting CPANEL dashboard.
If you are so unfamiliar with this, we suggest you to read our previous article Creating WordPress database on your new hosting provider. Provided in Step No. 3.
If you are already familiar with the above pre-requites you may be able to install WordPress in less than 5 Minutes.
Lets start off with:
Downloading WordPress
- Go to WordPress.org and download the zip file


Uploading WordPress Files to your web server
- Login to your Control Panel (CPANEL)
Before you can upload your files into your web server you need to login to your web host control panel.
Now, There are two ways to login into your Web Hosting control panel or CPANEL for you to manage your web files or web server.
1. You may go directly to your Web host website and click on the customer login portal.
2. Or you can simply go to yourdomain.com/cpanel
– Which simply means yourdomain.com is just an example for the sake of this instruction. Replace yourdomain.com with your actual domain name.
You should see a similar splash screen as shown below:

2. Go to File Manage. Press CTRL + F and type File Manager
After clicking File Manager a Newly opened tab will appear in your browser displaying all the directories (folders) in your web server.

3. Browse inside the public_html directory
If this is your first time installing WordPress in your web server you should only see a cgi-bin folder or directory under public_html

In the above screenshot, you will likely to have the same directory structure right after we have unzipped your WordPress into your web server.
4. Uploading and Extracting WordPress
a. Click upload link in CPANEL toolbar
– Remember we are working under public_html directory
b. Find your WordPress ZIP file which we have downloaded earlier in your local computer.
c. Click on the extract link in CPANEL toolbar
After extracting the WordPress ZIP file, you’ll now see a new directory or folder called wordpress. Now, Let’s move all the files contained in that folder.
Moving Your WordPress Extracted Files
Now we have extracted all the necessary files in WordPress ZIP file that we have uploaded in your web server. It’s now time for us to move it to the public_html parent directory. That means all files withing wordpress folder.
- Open wordpress directory by double clicking it.
- Click Select All in the CPANEL toolbar (as shown in the screenshot below)
- Click Move in the toolbar (as shown in the screenshot below)
- Specify public_html directory (as shown in the screenshot below)
– As your target directory which you are about to move your WordPress files.


Good job! We are almost done with the setup process. Now that we have uploaded your WordPress files and you already created a database for this setup. We are now ready to run the WordPress installation setup.
WordPress Installation
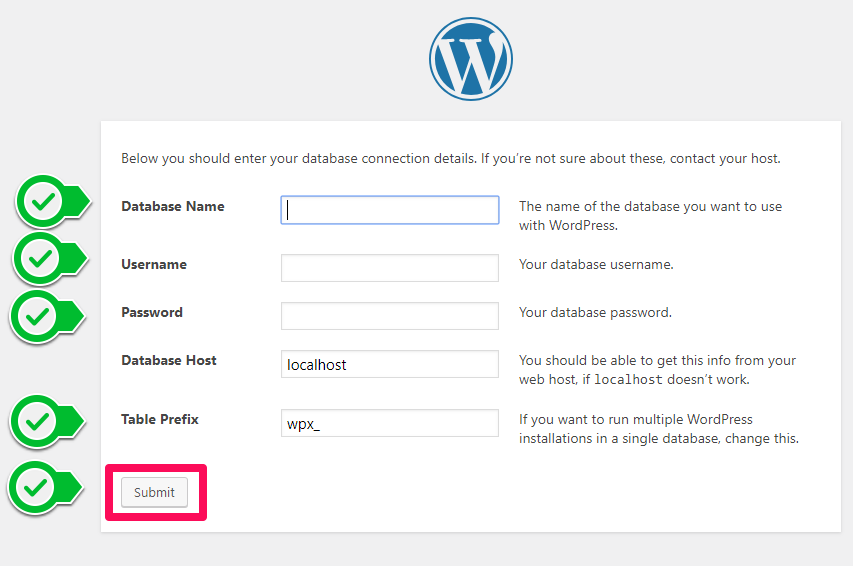
PRE-REQUISITES
Before you install WordPress make sure that you have the following requirements listed below:
a. Database Name
b. Database Username
c. Database Password
d. Database Host (you can leave it as localhost, don’t change modify this option).
e. Table Prefix (you can change the default wp_ prefix to something meaningful to you).
If you are now ready with the above requirements you may now proceed with the process.
- Go to yourdomain.com
– Change yourdomain.com with your real domain name. - Select desired language
- Click Continue button
- Click Let’s Go button


Fill in the information needed to run the famous 5 minute WordPress installation.
Now, we have come this far and we are on the final stage of our installation process. We would like you to prepare some of the information needed for your website listed below:
- Site Title
– The name of your Website it will be display on the browsers tab - Username
– This will be the one that you use when you login to WordPress Dashboard or Website Dashboard. - Password
– You may use the password generator provided in the installation process or you may create your custom password. - Email Address
– It can be used as your login username and or to recover your password. Be sure to have an active email address that you normally use. - Search Engine Visibility
– Check this option since you don’t have any content yet in your website to avoid search engines from indexing the default WordPress Content such as the famous “Hello World”. Don’t worry too much about this you may change this anytime in your WordPress dashboard once your website is ready for indexing by going to Settings > Reading > Search Engine Visibility and uncheck the option then save.

You just got yourself a brand new website.
We hope that you have learned something out of this process that we’ve made. We understand that it took you some time reading all the instructions. You’ll get faster in your next WordPress installation since you now have all the knowledge on how to do it.
If you think this article is worth to be shared please do not hesitate to do it and follow us on our social media accounts for more valuable step-by-step WordPress tutorials.