Introduction
In this documentation you will learn how to create a Mikrotik hotspot server. This is the most important stage for us to cater a hotspot service, where we also connect our PPPoE clients via our hotspot access points. Binding our PPPoE and Hotspot server into one network interface. Later in this documentation series we will cover them all to have it working.
Topic Outline
1. Wiring your devices
2. Installing WinBox
3. Connecting to Mikrotik with Winbox
4. Resetting Mikrotik Router
5. Creating bridge for Hotspot and Lan
6. Designating interfaces to Bridge Lan or Bridge Hotspot
7. Quickset
8. Network Troubleshooting
Moving forward, considering you have a brand new mikrotik router. Now, mikrotik comes with a factory default configuration and we don't that! because, we are going to configure it on our own preference that will serve its purpose. We recommend resetting the device to remove its pre-installed configuration first.
Wiring your Devices
Study the illustration carefully it shows you how your devices are connected.
1. ISP MODEM - MIKROTIK ROUTER - Plug one end of your network cable to the PORT 1 / LAN 1 of your ISP MODEM and the other end into the WAN / INTERNET port of your MIKROTIK ROUTER.
2. MIKROTIK - LAPTOP / PC - Plug one end of our network cable to the PORT 2 port of your MIKROTIK ROUTER and the other end into your LAPTOP/PC ethernet port.
NOTE:
We use this connection to configure our mikrotik router using LAPTOP or PC.
3. MIKROTIK - SWITCH - Plugin one end of your network cable to PORT 5 of your MIKROTIK ROUTER and the other end into PORT 1 of your SWITCH.
IMPORTANT TIP:
All other ports that are not assigned may serve as a reserved port for all other connection such as an additional laptop / personal computer, switches, printers etcetera that you may want to plug into PORTS 3 and 4 of your mikrotik router that is connected to the internet.
Installing WinBox in your Computer
1. Download Winbox from mikrotik official website download page https://www.mikrotik.com/download
2. Select either 32bit or 64bit version of the winbox installer. This will depends on the operating system that you are running in your computer.
3. Install Winbox into your computer by double clicking the installer that you have just downloaded and wait for the installation to finish.
Connecting to Mikrotik Router using WinBox
Go to your computer desktop or Windows Desktop if you are running windows operating system. Double click on the Winbox Icon to open the application.
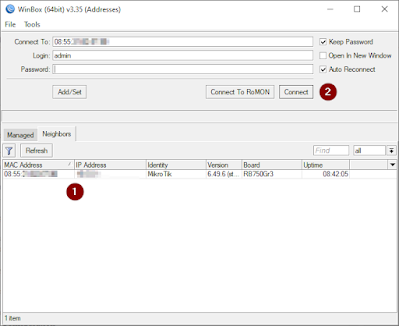
1. Double click on the MAC Address or IP Address that you wish to connect to. In the illustration below it shows only one (1) MAC and IP. By default IP Address will appear to be 0.0.0.0
NOTE:
If you have multiple Mikrotik Router nearby, it will shows several MAC Addresses every time you open WinBox Application. So, make sure that you pick the right one that you wish to configure.
2. Click Connect without having to worry about the password.
Resetting Mikrotik Device
1. Click on System
2. Click on Reset Configuration
3. Click on No Default Configuration
4. Click Reset Configuration. Wait until your router finished rebooting, then do the same process as mentioned in Connecting to Mikrotik Router using WinBox.
Creating Bridge For Hotspot and Lan
In this section, we will be creating two (2) bridges. One for HOTSPOT and the other is for LAN. Bridge Hotspot will be designated in PORT 5 of your Mikrotik Router and Bridge Lan is designated to PORT 2,3 and 4.
Bridge Hotspot - We can either connect directly our single access point antenna on PORT 5 or use a Network Switch if you have multiple access point antennas or some other devices that you wish to connect via your hotspot server.
Bridge Lan - This is where you will be connecting your personal computer. You can also use a Network Switch into these ports if you have too many devices that you wish to connect into your network.
Creating Bridge LAN and Bridge Hotspot
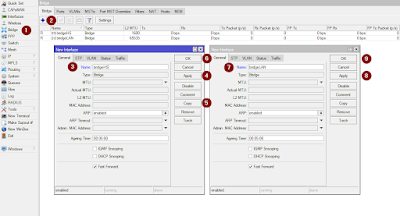
1. Click on Bridge
2. Click on the plus sign +
3. Enter BridgeHS in the name field.
4. Click Apply
5. Click Copy
6. Click Ok
7. Enter BridgeLAN in the name field
8. Click Apply
9. Click Ok
Now we are done creating our Bridges for our Hotspot and Local Area Network (LAN). Next we will proceed to the PORT tab of the bridge dialog box. The PORT tab is just beside the bridge tab of the bridge dialog box.
Designating Port Interfaces to Bridge Lan or Bridge Hotspot
In this configuration, this is where you will be assigning ports as planned in our port assignment illustration below. Just follow the steps provided in the illustration.
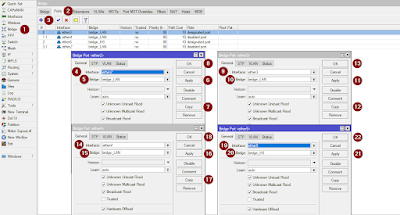
1. Click on Bridge
2. Click on PORTS tab
3. Click on plus sign +
4. Select ETHER2 in the interface field
5. Select bridgeLAN
6. Click Apply
7. Click Copy
8. Click Ok
Repeat the steps above and make sure to follow the bridge assignment on the individual ports as planned in our port assignment illustration.
Quickset
This is the easiest way to configure your Mikrotik Router to connect to the internet from your Internet Service Provider ( ISP ) modem.
Remember that we are using Mikrotik Hex rb750gr3. The interface may differ by its model of Mikrotik Router. If you have a different model other than Mikrotik Hex rb750gr3. The only difference maybe the placement of the fields numbered in the illustration below.
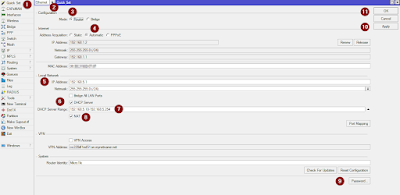
1. Click Quickset
2. Select Ethernet / HomeAP from the drop down menu
3. Select Router
4. Select Automatic
5. Enter IP Address (192.168.5.1)
When creating an IP Address make sure your last digit number is greater than zero (0).
6. Select DHCP Server
7. Enter 192.168.5.10-192.168.10.254
8. Select NAT
9. Create Mikrotik Login Password
The next time you login to Winbox you should provide the password that you have created in this step.
10. Click Apply
11. Click Ok
Expectedly your Mikrotik Router should now have an internet. Try browsing the web using your favorite browser. (ei. Google Chrome, Brave Browser, Microsoft Edge)
You should see a small TV screen in the lower right of your Desktop as a sign that you are connected to the internet. See the illustration below.
Otherwise you'll see a globe like icon if you are disconnected to the internet
If you are seeing a globe like icon shown in the illustration above, that means you haven't acquired an internet yet. Before anything else, Review all the process that you have done so far. If it is correct and still you do not have an internet we will proceed in the troubleshooting guide.
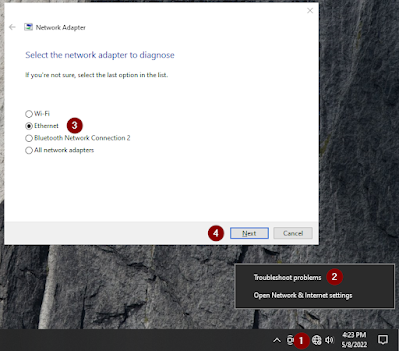
Network Troubleshooting
1. Right click on the globe like icon
2. Click Troubleshoot problems
3. Select Ethernet
4. Click Next
Wait until the troubleshooter finishes its job. Then check if you can now browse the internet and if you can't. There must be something wrong with your configuration.
You are free to reset the configuration provided in our Resetting Mikrotik Device topic. and repeat the whole process from top to bottom of this page.

